

Making a Dice Roller for Dungeons and Dragons Dice Pt.2


Continuing on from our last article, Making a Dice Roller for Dungeons and Dragons Dice Pt.1, we now start to build out our HTML/CSS files and add some functionality.
I started by setting up an HTML file that would hold a few items: a title, a selector for the number of dice we want to roll, a way to select our dice type (d4, d6, etc.), a button to roll the dice, and a display to show what the total of the dice roll was.
First, we set up a div with a class of "type-dice" that will hold the dice type choice. I decided to use radio buttons in this case which will have a class of "dice-selection". I intended from the start to have the radio buttons be images eventually, so the text is just a place holder.
<div class="type-dice">
  <input type="radio" name="dice-selection" value="4">4
  <input type="radio" name="dice-selection" value="6">6
  <input type="radio" name="dice-selection" value="8">8
  <input type="radio" name="dice-selection" value="10">10
  <input type="radio" name="dice-selection" value="12">12
  <input type="radio" name="dice-selection" value="20">20
</div>
Next, we set up a div with a class of "num-dice" that will hold the number of dice we want to use. This will have a minus ("dice-minus") and plus button ("dice-plus") surrounding the number ("dice-counter") so we can change the number of dice we want.
<div class="num-dice">
  <button class="dice-minus">-</button>
  <span class="dice-counter">0</span>
  <button class="dice-plus">+</button>
</div>
Now we need a button that will fire off our dice roll function created in our previous post and a place for the results to display. I created a div with class "btn-dice" to hold the dice and a button with a class of "roll-dice" to...you know...roll the dice. We also have a div with class "roll", a span with class "dice-results" to display the dice results, and a span with class "dice-all-rolls" to display the individual dice rolls.
<div class="btn-dice">
  <button class="roll-dice">Roll the Dice</button>
</div>

 <div class ="roll">
  <h2>Dice Total</h2>
  <span class="dice-results">0</span>
  <h2>Dice Rolls</h2>
  <span class="dice-all-rolls">0</span>
</div>
Some of the HTML layout changes a bit as we add CSS so I'll post the completed HTML a bit later. For now I just want to lay the foundation of our sections in the HTML. On to the Javascript, starting with some declarations to assign the HTML classes and sections above to a JS Variable
// Dice UI
// Grab all related classes from HTML file
let diceCounter = document.querySelector('.dice-counter');
let diceMinus = document.querySelector('.dice-minus');
let dicePlus = document.querySelector('.dice-plus');
let rollDice = document.querySelector('.roll-dice');
let diceResults = document.querySelector('.dice-results');
let diceAllRolls = document.querySelector('.dice-all-rolls');
Pretty straight forward. We use the document.querySelector method to assign our classes in HTML above to a Javascript variable that we can call later. Let's also do some set up for other functions by calling some variables and assigning values as needed:
// Display Counter
let currentCount = 1; // Set up display counter
diceCounter.innerHTML = currentCount;
I started at 1 with the display counter since we don't want to roll less than one dice. We'll set this up in one of the two functions below, dicePlus and diceMinus:
// Dice Plus
dicePlus.addEventListener('click',()=> {
  currentCount++;
  diceCounter.innerHTML = currentCount;
});

// Dice Minus
diceMinus.addEventListener('click',()=> {
  if (currentCount > 1) {
    currentCount--;
    diceCounter.innerHTML = currentCount;
  }
});
As you can see, I set up two functions that change our current count. Both functions use the addEventListener method to set up click events with our plus and minus buttons. When clicked, the function inside fires off. For dicePlus we increment the counter by one and send the results to the diceCounter. For diceMinus, we perform the same step as long as the displayCounter is 1 or more. We do not want the counter to decrement to 0 or negative numbers.
Now that we have our number of dice, we want to select the type of dice we want to use.
// Grab Selected Dice

function getDiceSelection(ele) {
  let diceSelection = document.getElementsByName('dice-selection');

  for (i = 0; i < diceSelection.length; i++) {
    if (diceSelection[i].checked) {
      return Number(ele = diceSelection[i].value);
    }
  }
};
This function first creates a variable "diceSelection" that will hold the value of the radio buttons from our HTML with the class of "dice-selection" in an array. We then iterate over the array with a for loop, looking to determine which of our radio buttons is selected. We then return the selected button value to getDiceSelection.
Finally, we need to roll the dice! I'll add a new variable to the script that creates an empty array to hold the rolled dice.
let rolledDice = [];
Last but not least, we create a function that rolls the dice. This will be another addEventListener method that is listening for a click event on our rollDice button. The function sets a variable with our getDiceSelection function, runs our dice function with the currentDiceSelection and currentCount, sets that to display the results, uses a .join method on our array of dice rolls and sets that to the diceAllRolls display, then resets our rolledDice array to be empty so a new roll can be made.
/* Clicking on Roll the Dice will run the dice function and display results
*/
rollDice.addEventListener('click',()=> {
  currentDiceSelection = getDiceSelection();
  diceResults.innerHTML = dice(currentDiceSelection,currentCount);
  diceAllRolls.innerHTML = '(' + rolledDice.join(') (') + ')';
  rolledDice = [];
});
With a little (too much) CSS, replacing the radio buttons with images, some fancy font, and a very more divs, our finished product looks something like this:
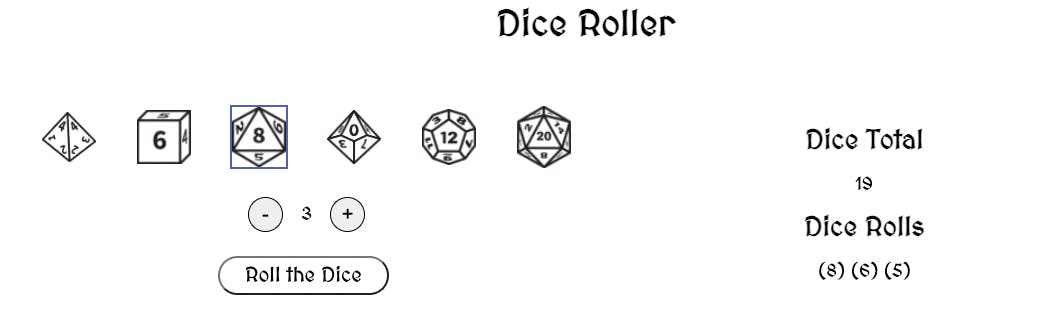
My next step is to add a little more style to the page and turn the whole thing into a component that can be added to other pages, particularly a chat page where the results of the roll can be loaded into chat, or a chat command can be run to perform the rolls.
The finished HTML, CSS, and JS files can be found here on my GitHub. I'm also hoping to make the project live on my website in the very near future.
Thanks for reading!